Gardening · Homesteading · Urban Homesteading

Building New Garden Beds

It all started with the removal of 3 very ugly contractor grade special trees:

IMG_20160405_155215

Good riddance. They blocked sun oddly, were not healthy, and poisoned the ground around them. The problem is…people put them in when small, then they grow quickly, and they are never shaped, and just go crazy in a few years. And get damaged easily in winter storms, when we have Artic blows.

IMG_20160319_153325

We have a massive deck. With the 3 sided wrap around stairs, it is 30 by 30 feet. The stairs are awful. 3 risers, no rails, just a wide deck to fall off of. And oh, this side was rotting badly. So we tore the entire length out. The steps were not structural at all either, so quite easy to do.

20160319_143024

Scariest was just how rotten and badly built the stairs had been done.

IMG_20160418_085338

Underneath? Oddly quite good soil. We tilled it up, and removed a ton of rocks, but it had been under cover for at least 8 or 9 years, so it wasn’t hard packed.

IMG_20160423_125430

At first I wasn’t sure what to do with it, but Kirk and I talked it over. We decided to run a long bed, and installed some leftover wood we had for trellis supports. With the many rocks removed, I ran 5 lines of rocks, to make separate beds, but also to provide a walking area, so we can work and harvest! The frame in front is landscaping timbers, watch for sales on them at places like Home Depot. You can easily attach them with metal plates and screws, and gently flip over, to make it look nice. Another option would be skinned trees to make a frame.

IMG_20160430_150825-1

I added in trellis netting that Kirk found on Amazon, using a staple gun to attach it firmly.

IMG_20160606_091616

Then once done, we fertilized the bed with a favorite organic fertilizer, and got set planting things like cucumbers in the back, so they can grow up! In the front are summer squash, which can spill out onto the lawn. I ended up tucking in a few leftover tomato plants as well.

IMG_20160418_123406

The bed above was at one time the kids play area, which we moved this year. However, we had a 20 by 20 foot square. On the left side is where the greenhouse was going in. As you can see, we dug down quite a bit, for its foundation. We covered the remaining areas with yard fabric, to ensure no weeds getting a chance.

IMG_20160418_123610

We went a different angle with this bed – we decided to use landscaping timbers, since Kirk had bought a number of them with the above bed. Since this is an “in ground” bed, not a raised bed, we were able to use them. We layed out the area roughly. Then put them together with metal plates and screws. Once ready, we removed the fabric and tilled it, removing rocks and working in fertilizer.

IMG_20160529_204926

Then it was planting time……

IMG_20160530_224352

30+ various tomatoes we grew from seeds, along with 9 various bell peppers. As you can also see, the crushed rock/sand has been layed in the walk paths alongside the greenhouse. More to come on that soon! I also added in a walk path, through the center, using salvaged rocks from the bed, and a few pavers I had on hand.

The keyhole bed is one I built last year with salvaged bricks, but put some thought into it over the winter on what direction to take it. It is now the main herb bed.

IMG_20160507_094843-1

Since this photo was taken it has fleshed out even more. The summer sun has been great for it! (PS: All those rocks? All dug up out of the beds…..) Use what you have on hand first, then buy….the tightwad’s method to homesteading!

Gardening · Homesteading · Urban Homesteading

Raised Garden Beds

Raised Garden Beds.

A very hot topic for gardeners and urban (or suburban!) homesteaders. They are being talked about from where you expect (gardening magazines) to even a year-long project in Cooking Light Magazineto newspapers – and pretty much all over the internet. It’s not a shocker why they are popular. It is a nearly instant garden, with minimal work at the basest form, no tilling, less weeding and you can garden earlier than if in ground. For example, the basics of garden beds is a good starter article.

Beds

Disclaimer: What works for us, may not work for you. I use materials you may not wish to use. And that is part of how raised beds can be genius – use what you have on hand, what you are comfortable with.

My first ones I built many years ago, when I lived on an Island, nicknamed “The Rock”. And that it was. A massive rock, covered with a wee bit of top soil. If you wanted to garden in most areas, you needed to build beds. I built my little garden there, before my oldest son was born. I think this photo is about 15 years old, when Ford was a bit over 2 years old. The beds were already weathering by this point. They were also pretty lopsided 😉

Something else I learned then was to build with what I had on hand. We used landscaping timbers I couldn’t afford then (I didn’t know any better). The beds were OK and held up, but were not deep because I couldn’t afford to build them high. So mostly I grew herbs, they loved the area.

When we lived in our last house it came with one large bed, ready to go. Only thing was it had been framed with wood – and the 4th “board” was the fence. Not what you should be using! By the time I decided to get back into gardening, the boards had rotted (It was in 2011 I had started poking around out there, we bought the house in 2004). After a lot of thought, I salvaged what I could, and put in plastic lawn dividers to keep it neat.

RB

In 2013 we added onto the original bed with another bed, that I dug out of the ground. I made it into three sections with pound-in plastic lawn trim.

RB1

It worked for the small property we had – and was the only section of the yard that got any real sun. Our yard was great in hot weather, as it was so shaded. For gardening, not so much. One major issue we did have was how big the bed was. I had to keep “walk paths” in mind, so I could get through. Large beds may seem like a good idea, but you will need to remember that you have to walk in there. In this case, I was working with what came with the house, so it was OK.

RB3

When we moved to our current home last April I had finally a place with potential – enough land to work with (where we would have an actual yard still for the boys to play in), it is flat, well-drained and SUNNY. But it also sits on some really lousy soil. Go down an inch or two and it is nearly all Cascade Concrete. Rocks everywhere. Raised beds are a must. Our first summer was last year, and we only had time to transplant our blueberries and cane berries. No time to put in beds. Still, we did have a small garden at least! I had made sure my swimming pool beds came with us, and I had added more as well.

Bed1

Kiddie Pools? Yes. Cheap. $9-12 each for the 4 feet across size. US made. They hold up well, 2 of the above ones are entering their 3rd year of use. A simple way to have a nearly instant bed. Drill drainage holes with a drill, throw in some rocks in the bottom, and fill with a blend of commercial garden soil and potting mix (to keep it light). They grow amazing carrots, beets and other items. With their curved walls, it also keeps slugs out. I even grew green beans in them. A tip: if you live in a neighborhood, ask if anyone has ones they don’t need. Its OK if they are on the ugly side and a year old…..better than going to the dump, no?

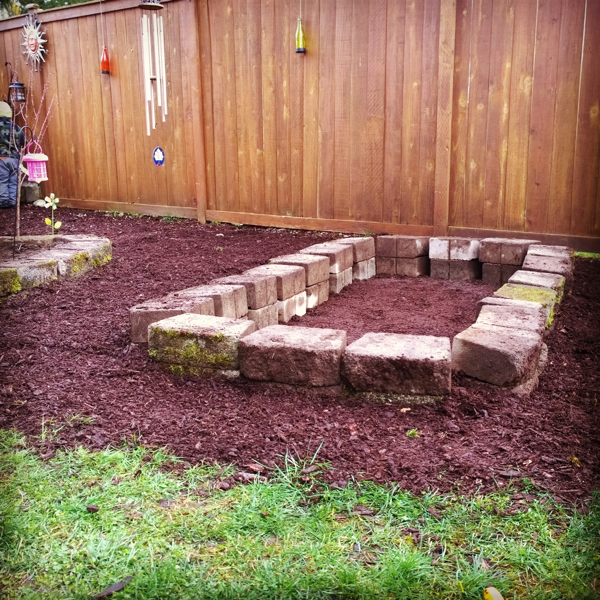
From mid-summer until now, I have worked at building beds – for as cheaply and efficiently as I can. Using recycled materials if I can. Yet, always thinking about long-term for the beds. I want them to last. As we worked on removing shrubs on the property and cleaning it up, I found many landscaping bricks. These are not cheap, so finding an amazing number of them set forth the design: Landscaping brick raised beds. These beds are partially raised, but are also tilled into the ground, with top soil and amendments worked in.

Bed2

A raised bed can be great for quick crops, such as peas – once the crop is over by late spring, you can plant a second crop that runs into summer! In this bed I have made hoops with curved bamboo stakes – I got them on clearance last year for a tiny price. I will run hemp twine around them for the vines to grow up. The twine I can compost later.

Bed3

Once I ran out of stones, we worked on other styles. The masonry brick runs about $1.09 each. They are quite heavy, but very functional on their sides. Instant deep bed.

Bed8

The classic cinder block raised bed, the blocks are $1.19 to $2 each on average. As a bonus you can fill the openings with potting soil (do not use top soil in this part, it is too heavy) and plant flowers or strawberries.

Bed5

Our house had come with a number of professionally built raised beds. In two corners of the yard they had put these tiny pie shaped ones. With ugly contractor grade trees. This one, in the back corner, we have put in a semi-dwarf fruit tree and the rhubarb I planted last year has popped back up for the year. You can always take those staid and proper suburban homes and use their landscaping to your benefit when it comes to gardening.

Bed4

But in another example of upcycling, we did have to tear down one of the large pro built beds, that was against the house. We moved every landscaping brick (these were large ones, which can run $3-4 each), and also moved the soil in the bed. Waste not!

Bed6

We had enough bricks to build two of these beds – this is the second one. The first layer is placed and then the landscaping bark in the area is brought back around it. I worked with what we had – and the bark mulch makes a great weed barrier, as well as having the raised beds look attractive – or better “finished”.

Bed7

Our current home also came with a number of professionally built beds, that were landscaped. I removed many of the bushes/small trees, and replaced them with small fruit trees.

Tub3

And as for upcycling: this was free. Yes, a bath tub. I am slowly disguising it with rocks and wood. It now has two currant bushes and strawberries in it. I put a layer of rocks in the bottom, and then a mix of soils to keep it light. On the top (not seen here) is a layer of mulch.

Tub

And one can build a non-traditional raised system in what is a “dead space”. One corner of our yard is a pile of rocks. I am guessing it is where they got tossed as they were dug up over the years. Now then, I have seen that we have endangered native lizards who live in these rocks – so I will not move the pile. But nothing says you can’t make it useful – and pretty. Using large pots I found at Home Depot (16″ across, for around $15 each, they sell bigger ones as well) I have built a raised garden of dwarf trees and cane berries. They are sheltered by the greenhouse, and as well by the fence (good for wind protection). If you choose to do something like this, make sure your plants have a layer of mulch on top to help with cold weather. As well, a layer of rocks at the bottom for draining.

Tub2

As for sizes, I keep my beds to about 8 feet long and they vary from 3 feet to 6 feet across. You want to make sure you can reach across at least halfway, for ease in chores. Anything more than 6 feet wide will make it hard. Make sure to leave enough space between beds so you can walk between – and kneel comfortably.

For more ideas, Sunset Magazine has a good tutorial on different styles – from metal troughs and how to build wooden beds. And check out:


Source: Fix.com

Gardening · Homesteading · Upcycling · Urban Homesteading

Swimming Pool Garden Beds

Last year in early May, I wrote a post on making raised garden beds using inexpensive children’s swimming pools. So did you wonder how that project went? Well, how about we peek in on this year’s garden:

PoolGarden1

I added in a second bed this year. It is playing host to two types of bush beans and a pumpkin plant. The beans are easily encouraged to grow up with various tomato cages, that I run hemp garden twine around (the vines need something to grab on).

PoolGarden2

Last year’s bed is back, filled to the brim with carrots. Walker asks daily “are the carrots ready?” Soon!

So…you just have to try this type of gardening. It exceeded my hopes last year. It is cheap and easy to put together. Go buy a standard kiddie pool, about 4 feet wide and 7 inches deep (buy made in the USA ones!), take home and drill drainage holes. Toss in some rocks at the bottom and about 4½ cubic feet of garden soil/potting mix. As I noted last year, keep the mixture light (not heavy on topsoil!) and it will grow great vegetables. Keep it watered, add in mulch every year and you have about the simplest garden you can make. And yes, the swimming pool survived the winter with no cracking, even with long periods of below freezing temperatures. And survived a move.

*OK, fine, yes…those fancy-pant decorator raised garden beds might look better in the yard, but they are not doing anything more than this one is. And this one runs $9-12 for the pool. Where as the fancy raised beds that are recycled plastic “boards” can set you back $50 to 100! You can always sink these pools into the ground and put bark around them, to hide the uglies. If you must. Or just claim your kids have their own garden 😉

Gardening · Homesteading · Upcycling · Urban Homesteading

How My Garden Grows: Fun Seed Time

While I am not sure if Walker quite understands gardening yet, he does love the results. The ones where he gets to pick goodies fresh from the garden! And I know Alistaire will be right behind him this summer….trying to wedge in for a few berries if he can. But I can at least try to show them how it is done, so Walker joins me while I dig and plant. He got a say in what we would grow in “his” garden. Which it seems has become a set of containers in a sunny area of the yard, against one of the fences.

What got this set in motion was reading a copy of How Does My Garden Grow?, which I had seen at the library. Maybe my garden/yard could be classier but then would it be as much fun? Let kids be kids……and this book will give you so many ideas of fun projects. Like growing potatoes in burlap bags. Or using whatever you have on hand as containers….

howdoesmygardengrow

So we planted organic heirloom corn in a well recycled cat sand bucket (it has been a rock and weed hauler for a few years – holes drilled in bottom, small rocks on top, then potting soil). The white bucket is behind my well used planters. The pavers came with the house, I found them a few years back buried halfway in the ground, along the fence. Why the previous owner had left them there? Who knows, she had some odd things going on in her yard. If the corn takes, once it is growing, I will stake it gently to bamboo stakes.

pool4

For our second project, we got frugal! I remembered seeing a Pin a few months back of raised gardens made with a kid’s swimming pool. I can say that yes, it works, and it is easy and cheap!

pool1

We picked up a 4′ foot wide kiddie pool, that is about 7″ high. Using a cordless drill with a wider bit I gently did a number of drainage holes in the bottom. Then I figured out a spot to park the pool in, and leveled it as quickly as I could (it already had yard fabric and bark mulch on top, from 2011, in a bid to quash weeds). Then we added in a number of small rocks on the bottom, for better drainage. I used about 4½ cubic feet of potting soil and “garden soil”, mixed together. I would avoid heavier “topsoil”. Containers do better with lighter soil.

Cost wise? The pool was about $11. Try building a wood one for that price! The soil we can use over and over, and add in homemade compost every spring to keep it rich.

pool2

We planted ghost (white) pumpkins, globe zucchini, finger carrots (they grow 3″ to 4″ long) and more – along with some marigolds Walker picked out today. To mark where we planted seeds, I used wooden stir sticks that I wrote on with a permanent marker.

pool3

As summer comes closer, I am hoping the boys will get excited to watch their plants grow. Hopefully the animals don’t eat them all!

The only downside was Walker thought we were getting a swimming pool to…swim in 😉 I told him that he needed a bigger one 😉