Preserving · Recipes

2 Bags of Cranberries: Canned Cranberry Sauce For The Year

Chances are you might be planning on making cranberry sauce from scratch this fall, for Thanksgiving and Christmas dinners. If you have a few more minutes, can a big batch of it instead. Then you have plenty to have on hand, but in small enough portions it won’t spoil in the fridge. And you’ll have plenty to use on turkey sammies this winter into spring.

And compared to commercial canned cranberry sauce, this is so much better. While fresh cranberries are not as cheap as in past years, you can find bags for $2.50 to 3.50 for each 12-ounce package. I spent $5.00 for 24 ounces, to make the batch. A commercial can is usually 14 ounces and retails for $1.50 to 4.00 a can, spending on brand (name or store brand) and if on sale.

So for my time I got 3.5 cans worth canned up. Where I shop the cans average $3 each, unless on sale as it is this week, for $1.99. So maybe I didn’t save a ton, but it was still cheaper.

And let’s be reeeeaaaaal honest here: Mine had less sugar, and there is ZERO corn syrup in mine. It is priceless to have food made with real ingredients.

Cranberries, High Fructose Corn Syrup, Water, Corn Syrup.

And while not calling out any specific company, due to the newer USDA guidelines on bioengineered ingredients, most cranberry sauce contains GMO’s, or as it’s known now “BE” (bioengineered) ingredients.

Now then……

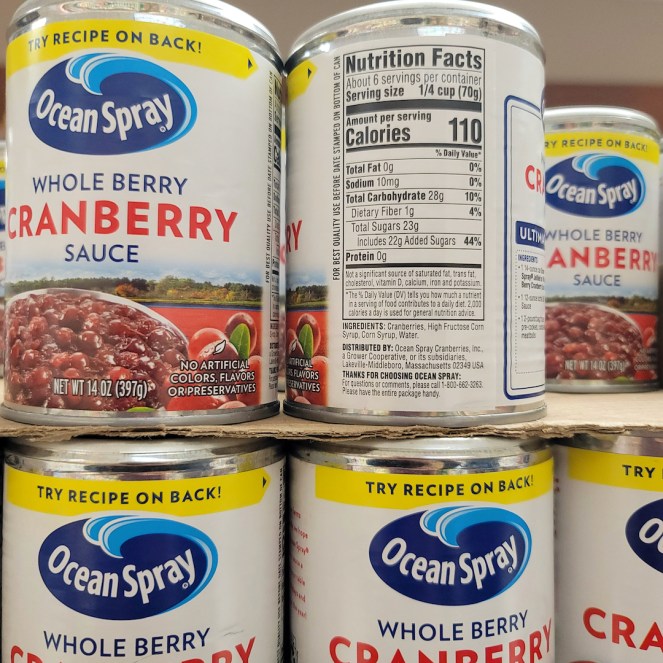
This company doesn’t reveal it on their cans, if it contains bioengineered ingredients. It doesn’t have a QR code for Smart Label. Just a phone number.

And yes, I CALLED that hotline. And I hate making phone calls. I asked and was told that the HFCS makes it bioengineered by the company. I am not saying their name, as they have mean lawyers. But I did my work and got an answer.

The only one this store had that was corn syrup free was the private label “Wild Harvest” organic sauce, which uses sugar. The private label “Food Club” is corn and HFCS, and while they have Smart Labels, the labels are not complete when you click on the link.

I’d say right there that making your own cranberry sauce is priceless. Because if you want to avoid HFCS, and GMO’s, you need to make it yourself, and use only cane sugar. C&H carries the 3rd party Non-GMO Verified. 99% of all beet sugar is a GMO crop. So yes, buy brand name with sugar or use organic.

This recipe follows current canning methods and is not rebel canning. Cranberry sauce is nothing more than jam and is an easy intro into water bath canning.

Canned Cranberry Sauce

Ingredients:

  • 2 12-ounce bags fresh cranberries
  • 1½ cups water
  • 4 4″ cinnamon sticks
  • ½ tsp ground allspice
  • ¼ tsp ground cloves
  • 4½ cups granulated sugar

Directions:

Thoroughly wash the cranberries and drain well.

Place 7 8-ounce canning jars into a canning pot rack, place in the canning pot. Fill the jars with water, and fill with water to the top of the jars. Bring to a boil covered over high heat.

Place the lids and rings in a small pot, cover with water and bring to a simmer. Turn off the heat.

In a stockpot (stainless steel or non-stick) add the cranberries, water, cinnamon sticks and spices.

Bring the berries to boiling over hight heat, periodically mashing the cranberries with a potato masher to help break up.

Once boiling, stir in sugar (be careful as the cranberries are hot).

Bring back to a full rolling boil, that you cannot stir down, and cook for about 5 minutes, until the sauce starts to set (it will be thickened if you spoon up). Stir constantly as it cooks, lowering the heat as needed so it maintains a boil but isn’t spitting on your hand.

Take off the heat, remove and discard the cinnamon sticks.

Drain the jars, place on a clean kitchen towel.

Sterilize a canning funnel and a ladle in the hot water, stir the cranberry sauce again and ladle hot sauce into the jars, leaving a ¼” headspace. Use a bubble popper or a chopstick to stir each jar gently, to pop any bubbles. Wipe the jar rims with a new paper towel, dampened with hot water.

Place a new canning lid on each jar, screw on bands until finger tip tight.

Place jars into canning rack, lower into the water, place cover on. Bring back to a boil, process for 10 minutes, starting timing once water boils.

Turn off heat, take off lid, and let rest for 5 minutes.

Remove jars, place on a cooling rack covered with a kitchen towel. Let cool, listening for the pings of the lids. Once cool, check the lids by pressing gently in the middle. If any spring back, put in refrigerator and use within a week.

Made 7 8-ounce jars.

Store in a cool, dry area for up to a year. And enjoy knowing what you are eating. Truly.

~Sarah

Homesteading · Prepping · Preserving

Check Out Our YouTube Channel

I’ve been adding a lot more content to my YouTube channel. Orginally, long ago, it was only for backpacking and trailcooking videos, but then I got busy in life and left it behind. I came back this past year and started making reels on Facebook about gardening, homesteading and prepping. Out of that I started adding some of those to YouTube, and that encouraged me to add more content this past summer.

For each playlist (section) I have picked a video to check out.

Homesteading & Farming: 

Freeze-Drying:

Homesteading Projects & DIY:

I am working on new videos for this section currently!

Essential Oils:

Prepping:

I hope you enjoy them. I love to hear your comments. It is very appreciated.

~Sarah

Preserving · Recipes

Slow Cooked Pumpkin Pecan Butter

There is a lot to be said about pumpkin butter and canning it. That part I will leave up to the reader, if they feel safe with canning it. The USDA and the many college extensions will say to not do it.

Why? Because pumpkin is a low acid food. This makes water bath canning dangerous due to the risk of botulism. Now then, this recipe does contain both sugar and acid (and plenty of that) bringing the ph levels up. Canning plain pumpkin is a no-go unless you do pressure canning – and it should be cubes, not mashed. Now then, I myself did feel OK with water-bath canning this pumpkin butter. But to be on the safe side, I then chilled it, and then froze it. While I feel it is safe enough to consume as is, I would not recommend you can it. (But I’ll leave it at this: small jars and 10 minutes, then 5 minutes in the canner to rest.)

But you can happily make this spread and keep it on hand by freezing it (no need to can even). Use it liberally on bread, pancakes and such. Or serve with chicken instead of apple butter! It’s so very delicious.

Does it need the pecans? Honestly you could leave them out, but it does add a real depth to the flavor. A little crunch. so very fall the flavor.

Slow Cooked Pumpkin Pecan Butter

Ingredients:

  • 29-ounce can pumpkin puree (or 2 15-ounce cans)
  • ½ cup water
  • 2 cups brown sugar, packed
  • 3 Tbsp orange juice
  • 3 Tbsp lemon juice
  • 1½ tsp cinnamon
  • ½ tsp fine sea salt
  • ¼ tsp ground allspice
  • ¼ tsp ground ginger
  • Pinch ground cloves
  • 1/3 cup pecans, finely chopped

Directions:

Add all ingredients into a slow cooker (or use the slow cooker setting on medium on your InstaPot, with the slow cooker lid on), and let cook for 8 hours. Stir every hour or so, scraping the sides.

Let cool down and pack up, then chill or freeze, for longer term storage. See notes on water bath canning above.

Makes about 5 6-ounce jars plus a smidge more.

~Sarah

Freeze Drying · Homesteading · Prepping · Preserving

Freeze-Drying The Sweet Side Of Cakes And Bread

This was a fun adventure with our Harvest Right freeze-dryer. I made up 2 chocolate cakes, 2 gluten-free pumpkin breads, and 1 of my favorite sugar-free cheesecake to freeze-dry. We run on a Large size unit, with 5 trays.

With the cake and bread I replaced all the oil with unsweetened applesauce, to keep the fat content down (oil isn’t your friend in freeze-drying). The cheesecake I do is crustless, but due to the cream cheese I won’t keep it for long-term food storage. It will make a great trail snack though to take along, and as well for treats this winter at home.

How To:

For all three items bake as normal, then let cool to room temperature. I used a 9″ x 13″ pan for the cake, an 8″x4″ bread pan and for the cheesecake a standard glass pie pan.

Use unsweetened applesauce to replace the oil called for, to keep the fat content lower.

Cut into small portions, thin sticks or cubes works well. If there were crumbs, toss those in as well onto the trays.

Place the items on each freeze-dryer tray, I found one cake or bread fit perfectly on each tray. It’s OK to pack it in.

Keep each flavor separate.

I then put the plastic lids on each tray and froze till solid.

Then I sent them to the freeze-dryer, using the auto settings.

Due to the cheesecake being a more dense item, we added 10 hours extra on top of the auto setting.

This came out right and all items were ready to store.

We used glass mason jars this round, so they wouldn’t get crushed, then sealed the jars with our Avid Armor chamber sealer. Every container got an oxygen absorber and a desiccant packet added.

I’ve included the recipe I used for the cheesecake. It is super simple and tastes great. I make it sugar-free but you can make it regular of course.

Sugar-Free Crustless Cheesecake

Ingredients:

  • 2 8-ounce packages cream cheese
  • ¾ cup milk
  • 2 large eggs
  • 2 tsp pure vanilla extract
  • ½ cup Bisquick mix or similar baking mix
  • 1 cup sucralose (or granulated sugar)

Directions:

Preheat oven to 350°. Lightly oil a 9″ glass pie pan.

Add all the ingredients into a blender, mix on medium and then high until mixed.

Pour into the prepared pan.

Bake for 45 minutes.

Let cool fully before cutting.

Makes 1 cheesecake.

I made the chocolate cake with mixes I got on a huge sale on Amazon. Because why not? Fun and easy. Yes, I could have made it from scratch. Now then, only use cocoa powder if doing chocolate. Do not add in chocolate chips. Actual chocolate doesn’t freeze-dry. Just don’t try it!

For the gluten-free pumpkin bread I used King Arthur mixes. I am not a master of GF baking, so honestly, a mix means it’ll turn out and our youngest will love it later on.

300x600-2

~Sarah

Gardening · Herbalism · Preserving

The Fleeting Season of Medicinal Flowers

The past few weeks every time I was in the gardens – or out on walks in the woods, if I saw flowers popped up, I was picking them. This is a yearly thing for me, in late summer as we approach fall.

I played it right, and got a lot picked before the rains showed up this week. Just a day of rain – but very heavy at times. The sun will come out till end of the week, which should promote the final blooms for me to pick even more.

Heavy rain for a whole week, next week, is predicted. So I know I am almost done for the season.

Why should you pick medicinal flowers?

When you buy online, you are taking a gamble of where the item was grown, and how it was grown.

If you are interested in making body care products, you might see crunchy mamas talking about making infused calendula oil to use in salves, soaps and more. Which is a great use for calendula and an excellent intro to herbalism. But it also takes a lot of flowers to do it. And if you buy online, you have no idea how they were really sourced – or if they were grown in the USA (or your country as it applies to you). I do not want to be using Chinese grown flowers in my herbalism!

If you grow your own (and if do this, most flowers will self seed and spread on their own by year 3) you win in two ways: you have a source to pick from, and you provide for the native pollinators amply. You also will get free seed yearly to store for the next year, if you choose to.

I let the flowers grow randomly amongst the vegetables. It’s a win win for pollination.

Strawberry Calendula.

Strawberry Calendula. As you can see it comes in a varying range of colors.

Orange Calendula. This is the version most think of when they buy the flowers dried. It’s often pale yellow due to being exposed to heat while drying.

White Lavender. Lavender comes in many shades, not just lavender the color. Find a good grower and find a vast world you didn’t know about. Some of these types you can grow from seed, others must be started by plugs.

Native wild rose petals, to be carefully plucked. These are Sitka Roses.

And no not forget to take some rose hips. From Nootka Roses.

For best results pick once the morning dew has gone, but before it gets warmed up (so midday from say noon to 3 pm is a no-go). You want dry blossoms to pick.

It’s a simple process. I have a small picking basket lined with cardboard baskets. As I walk along the rows, I pluck and put in by type.

When I get done, I get out paper lunch sacks and add each particular flower to a bag. I fold over a bit, to keep out light and dust. Then every day or two, I flip the bag over. Don’t overload the bag of course, if you have lots of flowers, and if they are heavy, such as Calendula, better to only have a dozen blossoms in each bag.

The flowers will slowly dry naturally. They won’t lose their color nor their essential oils deeply hidden in them. It’s far better than drying flowers in a dehydrator with heat. You pay for it by the flowers losing aroma and color.

As for rose hips, I cut them in half, scrape out seeds and pith, then air dry – you can leave them on a paper towel lined plate, or do the paper bag method.

Once everything is fully dry, or you remember about all those bags loitering around, transfer them to dry mason jars. Store out of direct light and use within a year for best results.

~Sarah