Gardening · Homesteading

Building A Garden Quickly

In a recent talk I gave on gardening I brought up the value of raised beds in a garden. If you are thinking about growing a garden for food security or for having fresh produce as soon as possible this spring, raised beds will get you going without the months of prep needed for in ground beds. For some people though it can feel like raised beds are not a “real” garden, but they are. It’s just different is all! And you can do both. Quick beds while you take the time to get your in ground bed done properly.

When we lived at our last place, I built many raised beds in the 4 years we were there. Eventually it became a flowing area as I added more and more. It was a way to garden and fit into suburbia.

In fall we would build hoop houses on the beds. This is very easy method of extending the growing season for 2 months on each side. Or more.

Benefits:

Can be built on land that isn’t good for gardening. If your land is rocky, sandy, clay, etc this will help considerably.

Can be built in soggy areas and the beds don’t get damp.

Raised beds are quick to build.

Usable as soon as filled with soil.

Warm up faster in spring, and stay warmer into fall.

Easy to weed.

Suppresses pests such as rabbits.

Build higher for easier working in beds.

Easy to fence.

Can look “nicer” in urban settings.

Work in progress.

One of the fun things about the beds is I could do trellis systems to suit my whimsy.

And the boys loved picking.

Types of raised beds:

Wood frames

Fallen trees, cut to fit

Metal beds

Plastic beds

Cinderblock beds

Swimming pools

My personal favorite?

After many years, in 4 locations, my favorite beds are the concrete cinderblock.

Cheap to buy the cinderblocks, and made in the US (often locally made by region). You can build them 1 layer, 2 layer, even 3 layer. The open pockets on top allow for fencing or trellis to be placed in them. In a weekend you can build an entire garden.

Lay down thick layers of cardboard, then place the blocks. The cardboard will kill weeds and grass.

If you want to be fancy, lay down black yard/garden fabric instead across the area. Then do the blocks. After you are done, you can decorate the walk paths with wood chips, bark or pebbles. This will control mud and weeds (as you walk around your raised beds over time, you will wear down to the ground and it won’t look as nice).

Fill with soil, and you are ready to go. I suggest a mix of 3 in 1 soil (if you make many beds, buying by the truck is a thing) and mushroom compost or manure.

Each year, gently turn over the beds with a garden fork, and as the soil settles lower, add in more compost and gently work in.

There are other forms to use as well – concrete blocks and fancy blocks. When we lived there, the neighborhood decided to remove all the fancy blocks around the public trees. Anyone who wanted them could grab what they needed. We brought back many loads to use!


It’s easy to add in trellis systems to the beds.

Too many rocks? Make pretty walking paths between the beds.

Another raised bed we did, I loved to sit here in the herbs.

And even on our farm here? I still have raised beds. They were the first things I built when we moved in almost 4 years ago.

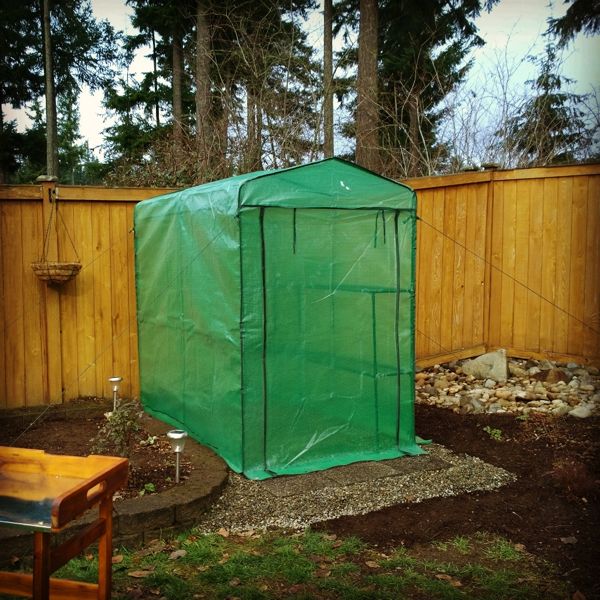
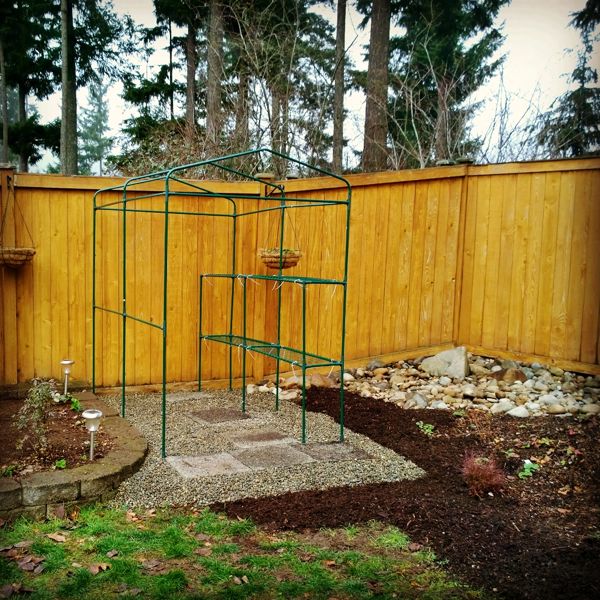
This is one I am still working on. I found most of the parts in the woods. All those blocks had been left to be covered in moss! So I hauled them out, and got building. I just finished filling it up with more compost, weeded and smoothed out. I am working on a greenhouse cover for it currently. It’s right by the house, so this bed will be a great “salad” bed to grow lettuce and similar in.

~Sarah

Gardening · Homesteading

Setting Up Portable Greenhouses To Last

In 2015 I acquired my first portable greenhouse (or as I refer to them sometimes, a pop up greenhouse). Back then I wrote a post about setting up that first one. (Which is worth reading, as I walk through setting up one of these.)

Those blissful years of urban gardening. This one was beautifully set up, where it even had a finished floor. 

Now that we live rural, I am not so worried about things looking pretty, but it was worth the work then for the look.

Often in reviews of them the constant complaint is how the wind shreds the greenhouses, and they are destroyed quickly. Over the years I have learned many tricks to make them last longer. Because the portable greenhouses are a (mostly) affordable tool that one needs in microclimates. Particularly on Whidbey Island in Washington State. If you want to have a longer growing season, and produce more food, you need season extenders.

So over the years, even after I got a real greenhouse, I have continued to use these portables. And I have found I can get them to last far longer. I keep the covers on from around February to May, then I make sure they are dry, and fold them up to use the next year. The frames last 3 to 4 years, or more. They will get rusty, but will keep working. If your cover tears, you can get replacements. They might not be perfect fitting, but will work. The white covers I find at Do It Center hardware franchises, they are holding up well. I avoid the clear plastic greenhouses, I find those covers are very tight and tend to rip easily.

Don’t leave the covers on year round if you can help it. The UV damage will eat at the covers and cut the life down on them quickly. If it snows, and you have them up, be sure to go out and knock the snow off gently. Reduce the weight on the roof.

I use them along with my greenhouse, for overflow (we grow a lot of starts) and have the potting table next to them for ease of use. This year we set up an actual grow station, and put it inside a large dog run that was given to us, to keep the chickens, dogs and deer out of. Having it all nicely together, it makes my work more time efficient but also keeps it warmer, with it being dense, it blocks more wind.

I shuffled things around this year till I liked it.

I need to buy a replacement cover for one of the pop ups.

Having a tidy area to work in also gets you more likely to get to work.

Potting table ready to go. 

Now then. If you build a portable greenhouse the frame won’t blow away. But once you put the cover on, it becomes a kite. You must keep it held down. Each brand/version that is sold will have different ways to tie down. Some have 4 (or more) points to attach rope to, to then connect to stakes. These in theory work, but if it is windy (and this island when is it not windy?) will either rip out of the ground, or rip out on the cover. Instead, here is what we do:

After building the frame, you can wrap duct tape around the metal pieces where they connect to the plastic connectors, if your frame has that. Some newer styles are fully built and are a pop up tent. However, these styles don’t have built in shelving.

Zip tie the shelves onto the frames. This gives stability in wind storms so your pots don’t fall off. As well, always put your pots on 1020 trays so they are not bouncing on those (always) unlevel shelves.

For best wind protection, have your greenhouse back up to a fence or building. Fences work well as you can connect to them.

If against a fence, and your cover has D rings or fabric loops, use zip ties to connect to the fencing up high. I lash the lower frames to the fences as well using long zip ties (or connect a couple together to make it longer). This holds down the back side efficiently. If against a building, it will be harder to do this. You can use the included rope to stake out the back however.

The biggest thing you can do is weigh out the bottom of the frame. We use paver bricks to do this. They are flat and heavy. We use 4 per greenhouse. 2 per side. I suggest using 12″ versus 16″ size, so you are not tripping over them as you putter inside.

You can see both sizes are used and the 16″ overhangs quite a bit. You can also see a white zip tie in the corner, around the frame, where it connects to the fence behind.

Another option if you have extra wood laying around, is to make a frame, and then using the U shaped brackets, screw it down into the frame. That will add a lot of stability.

Some of the covers will have overhang at the bottom, a skirt if you will. These you can place rocks or bricks on, to help hold it down. If it has it, use it. The white covers I am using now don’t.

The last thing though, that ensures dealing with winds? ZIP THE COVER TIGHTLY. I know. It is crazy, but don’t leave your greenhouse open at night. Only during the day, to regulate the temperature inside. As soon as the sun starts dipping I go zip up. Often you won’t need to vent the greenhouse until end of March and on. By May as I get ready to plant the covers come off to harden the plants (just snip the zip ties on the cover and pull off). Each day, when you open up the greenhouse and roll the door up, take the time to check the Velcro tabs around the frame are still together. Some covers will have ties instead, and these hold better over time. The Velcro will slowly loosen over time, so redo periodically.

~Sarah

Gardening · Homesteading

False Spring Seeds To Start

False Spring is the period of time in late January to early March when we get stretches of nice weather, as the light returns, in the PNW. In Grow Zone 8b, on Whidbey Island, we can go stretches without rain (I know..shocking, but it is true, especially in the Olympic Rainshadow). This can lead one to jumping the start line too early with in ground seeding. And then winter resumes, with more light freezes, lots of rain and often a light sprinkling of snow.

Last weekend I hosted my first seed swap and the amount of people that came to it was off the charts! People are excited to grow food this coming year.

But you can combat it by seeding things in your greenhouse, a pop up greenhouse, or in a sunny window inside. I recently did a new potting area for the homestead, using a dog run we got from a neighbor to keep the deer out. Before I had had it all in the orchard, which is fenced. However…we upped the chickens in there, and it led to issues. We feed them sunflower seeds as treats and it brought in many squirrels and chipmunks, who tore up our plants by burying the seeds. No sunflower seeds around, no issues. Worth a few hours work to move all the tables and pop up greenhouses over. This area sits in almost full sun. (We take the covers off of our pop ups in early summer, dry them, and store till late winter. This helps avoid UV damage and you get a longer life out of them.)

Spend these sunny days (or at least not raining) to get your garden ready. Weed, fix fences, get a potting area ready. Clean out your pots, see what you need to purchase, get your potting mix ready. Then, and only then, start some seeds. Use it as your reward to get seeding.

I prefer potting in 4″ pots, rather than cell trays, as I then don’t have to transplant up after the seeds germinate. It’s one less chore to have to remember to do. And the plants can develop a more rugged root system. The 4″ pots last 2 to 4 years (or more!) even though they appear thin when first using. I put them in 1020 trays to hold, and use a standard grow type soil (Sunshine Mix #4) that I add a bit of organic fertilizer to, in a large plastic bin I use (not in the picture, but is now).

What can you seed:

Herbs can be started this early. Most need awhile to get going, and earlier will give you big plants in summer. A few to consider –

  • Basil
  • Parsley
  • Oregano
  • Rosemary
  • Chives
  • Thyme
  • Sage
  • Lavender

Flowers

Vegetables:

Artichokes

Asparagus, from seed

Bok Choy

Beets

Broccoli

Brussel Sprouts

Cauliflower

Celery

Chard

Collards

Kale

Kohlrabi

Leeks

Lettuce

Onions

Peas

Peppers

Rhubarb, from seed

Spinach

Strawberry, Alpine types

Swiss Chard

Tomatoes

In early March start bush and pole beans, to give them a start, for the first planting. After that I will start in ground seeds, but it helps you avoid pests and give you a chance to avoid slugs/snails in March, and to have time to use Sluggo to get rid of them.

~Sarah

Gardening · Homesteading

Just A Farmhand

The other day I encountered a bitter person who threw what they considered an insult towards my family. They said “Just a farmhand” at my brother – said to me directly, as if that made him the lowest in society. They truly thought it was an insult. It showed how they think their pay grade is somehow higher. And the thing is…almost no one is above doing labor work. If your hands are smooth, maybe you need to ask why they are.

And yet….society needs farmers 3 times a day. Breakfast, Lunch and Dinner. And all those snacks and desserts. Farmhands are why grocery stores have food for you. Why plant nurseries have plants to buy.

The majority of people never stop to think about how their food gets to them.

But somewhere….a farmhand worked in the hot sun to harvest the wheat, rice and oats. The beans. The berries. The apples. The meat you consume. For the majority of America and Canada – and nearly all “First World” countries, the farmhand toils quietly and is never recognized.

That “just a farmhand” helped me set up a deer safe potting area recently, for our plant nursery. He helped get our main greenhouse ready yesterday, by hauling heavy loads of used hay out of it, and then hauled tray after tray of soil filled pots into it, to start the plant production for the growing season. That farm hand will help me ensure our fences get repaired and put up, to keep the deer and rabbits out. He will weed. He will help with irrigation.  He will haul animal feed and swing hoses around.

I have deep respect for those who work as farmhands. They might have dry, callused hands – but it is honest work. The kind that lets you sleep well at night.

And many farmhands are people of color. They do work that comfortable people think is below them now. If you are eating strawberries in America, you can nearly bet it was picked by a hard working Hispanic.

If you want to look entitled….look down upon people who do the work you consider below you.

You are not special. At all.

And I highly doubt the insulter could last a day without whining on the farm…..and he’s welcome to come over. The weeding is never done!

~Sarah

Gardening · Homesteading

Gardening On Whidbey Island

As February nears, the call to get gardening is at a frenzy. The nice weather we get in late January doesn’t help either. Often in this time period we get “first spring”, a week or two of sunny weather where the start of spring starts popping out (buds start forming, dandelions pop up, trees start to show life). You must ignore first spring though. For winter will be back. Don’t give in.

That doesn’t mean you can’t start ramping up to gardening season however! And…you should. There is plenty to do, to be ready for when the sun returns high to the sky in the north. I’ve included a list of articles we have written about gardening on scenic Whidbey Island, Wa to help you plan out your year – wether you are a seasoned gardener, or a complete newbie. It doesn’t matter if you have just a balcony, or 5 acres – you can grow something this year!

The Basics:

  • Whidbey Island, Wa is considered Grow Zone 8b. Now then, there are some microclimates around the island, especially in the low hollows (Maxwelton, Possession Point are two areas) or at the higher points on the north end. But in general, 8b can be trusted. The last frost date for Grow Zone 8b is on average April 15th, and I highly recommend you don’t put out your tomatoes and similar into the ground until Mother’s Day Weekend in May. Do that, and you will be solid all around. If you are in a microclimate, you will notice it within a year.
  • In general we have mild winters, with short freezes and snow for a couple of days. Our fall thru early spring tends to be wet. Summers are usually warm and dry. Though only hot for short periods of times.
  • Due to the Olympic Mountain Rainshadow, some areas of the island get far less rain, where as the north end and the tip of the south end get a lot more. Plan for this.
  • Keep a gardening journal. Every year. Note when you start seeds, when you set them out, when you seeded in ground. What grew, what didn’t. Mark the weather. Take a lot of photos. Especially when there is snow or hail. I can go back many year and know when we got cold snaps. To remind myself to not start too early.
  • Get your infrastructure done when it’s still cooler out. Weed existing areas. Top off with more soil or compost. Build raised beds, open up and till the land if you want in ground. Our ground rarely freezes on the island (outside of the once or twice a year Frasier River Valley freezes that come down from Canada.) It’s just a lot easier to work under a lower sun, in the 40’s to 50’s than rushing in April in the heat. And…if you weed now, then the weeds never get a chance to grow big – and get bigger roots.
  • How much to grow. I sat down and wrote this article for myself. Because it’s just that much easier if you have a guide to go off of.
  • Consider chickens. They are easy to handle, give you eggs and manure, and help keep bugs at bay. Even in towns, you can often keep a couple hens. Children can help in taking care of them!
  • Start a compost pile, and eventually you will have free compost soil to use.

The Articles On Gardening:

When To Plant Seeds (Read this one first!)

February Garden Tasks

March Garden Tasks

April Garden Tasks

May Garden Tasks

June Garden Tasks

Late Summer Potatoes

Planting Fall Crops

Planting Garlic

Planting Fall Onion Sets

Savings Seeds

5 Months To Prepare Your Garden (Why working in fall is good)

(Growing food is one of the most freeing things you can do!)

Other Articles About Gardening, Farming, and Homesteading To Read:

Why We Don’t Use Grow Lights

Letting Chickens Have The Winter Off

Growing Alpine Strawberry Plants From Seed

Building A Strawberry Bed

Making A Seed Vault (and seed packets)

Using Silage Tarps To Prep Beds

Dealing With Microclimates

Swimming Pool Raised Beds

Raised Beds From Reclaimed Trees

Felled Tree Raised Beds

Cinderblock Raised Beds

Building New Garden Beds (urban homesteading)

Build A Kinder Garden

Grow Food, Not Lawns (How to grow in urban areas)

Build A Simple Hoophouse, Get 3 Season Growing

Prepping For Early Frosts

Building a Sunglo Greenhouse

The Money Pit of Heating a Greenhouse

The Survival Garden

~Sarah